Days Four and Five
In one sense these two days are a continuation of Day Three because as the levels of Boiled Linseed increase along with the depth of the colour. More importantly, so too does the time it takes for the oil to be absorbed into the wood – except on the end grain, naturally. After I'd wiped six coats on the body I was happy that most of the redness had been removed and I began applying the coats of polyurethane varnish.
This was planned from the outset to be a satin finish – I was very struck by the look of a recent Fender guitar model finished in satin though I didn't properly appreciate the implications of taking the same route.
First of all, I chose a coloured polyurethane varnish intending to move further from the mahogany colour – my choice was Rustins in light oak. This was a good choice and worked well. As with the first guitar build I used a very diluted treatment and of course, this meant the polyurethane was absorbed into the end grain. Ultimately this meant the body needed a total of six coats, the last two of which were only diluted 10%. The result is very satisfactory if not exactly the same as the Fender treatment but then again I don't think Fender was using mahogany.
As with the guitar I made a couple of months ago, I only applied a single, strongly diluted coat to the neck (and none to the fretboard). This kept the neck feeling very 'untreated'. I've also signed the face of the headstock with my own name using a white Posca pen on the second satin polyurethane coat. At the same time, I decided to finish the face of the headstock with two 100% coats of clear gloss polyurethane to seal and set off the signature and complement the shiny machine head rings.
While the face of the headstock was drying I started to hook up the electrics. This proved to be much more fiddly than the same process on the PRS style guitar, my previous project. This was due in part to the design of the bass guitar and partly due to very inadequate printed instructions.
As with all electric guitars the metal parts, strings, bridge etc must be earthed. The PRS style has hammer-in studs and it was simple to locate the bared wire in the hole before you started hammering. On the other hand, the Fender bridge is secured with seven screws and a length of bared-back cable has to be fixed to the bridge. This plated and difficult to solder. The clear alternative is to push the bared wire into one of the screw holes and have a multimeter handy as soon as you've screwed in the wire to ensure that a good contact is made.
As far as the rest of the hookup is concerned, it seems that Coban is switching from solder connections to plug-together joints. I can understand that the need to solder the electrics might have been a disincentive for some parts of the market but it means the whole operation of the instrument depends on very inexpensive plastic and pressed-metal connectors. After encountering a failed connector in my first guitar I decided to replace all connectors with soldered links covered with heat-shrink tubing. It takes time but gives confidence.
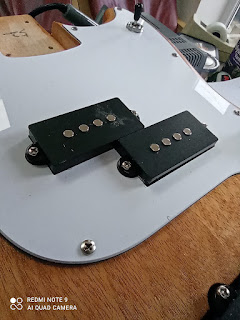
However, the connectors aren't the only fiddly bit. Worse still are the pickup mounting and adjustment screws. First, you have to juggle up to four screws each of which passes – in sequence – through an ear of the pickup and then through a slim coil spring about 20mm long. Inevitably as you lower the first spring/screw combination into place there's a risk of one or more of the other springs falling off.
Furthermore, there are no guide holes pre-drilled for you and no reference is made to the lack. Even more important is the fact that the guide holes must be carefully drilled perpendicular to the body and large enough to permit easy adjustment of the screw. This is because the screws are doing two jobs, securing the pickups in position and allowing the player to adjust the pickup height beneath the string. It's not a difficult procedure but must be done with care.
Additionally, the plastic pickguard has an aperture through which the pair of neck pickups emerge and the pickguard has to be temporarily fitted to ensure that the correct position of the guide holes. Again, it's not difficult but equally, it's not as straightforward as the previous build.


Comments
Post a Comment